


Eco 100 Era: Online manual
The settings menu of the JRS Eco 100 Era router
The settings menu of the JRS Eco 100 Era router can be accessed by typing http://192.168.4.1 in the address bar of your browser. Log in with the username root and the 10-digit ‘Router pwd’ or ‘Admin key’ found on the label on the bottom of the router. If you cannot open the login screen at http://192.168.4.1, please note that it is only accessible from a computer that is directly connected to the Eco-router, either via a cable to one of the LAN ports or wirelessly via the Eco-router's wifi network. You may also need to check the cabling to the Eco-router: How to install your Eco router - video manual. Also, make sure that any VPN connections on your computer are disabled. All JRS Eco settings can be found under the heading ‘Eco 100 Wifi’. To change the administrator password for accessing the settings menu, go to System -> Administration -> Router Password tab. (The administrator password is a different setting from the wifi password.)How can I adjust the transmit power of the JRS Eco 100 Era?
The JRS Eco 100 Era comes with a default transmit power setting of 63 milliwatts. This is lower than standard routers, and you can reduce it further if you wish, or increase it, depending on the size of your home and how much range you want.- Log in to the router's settings screen. (See How do I access the settings menu of the JRS Eco 100 Era router?)
- Click on Eco 100 WiFi.
- Click on Set Power/Range.
- You can use the sliders to adjust the transmit power. Try to find a setting that gives you enough signal in your home, but not too much.
How can I set times on the JRS Eco 100 Era when the wifi turns off, for example at night?
The JRS Eco 100 Era has a Wifi scheduler/timer, which allows you to schedule times when the wifi turns off, e.g. at night, and turns back on, e.g. in the morning. This allows you to ensure that the router turns off the wifi even if there are still wifi devices connected. The wired ports will continue to function as normal.- Log in to the router's settings screen.
- Go to the Eco 100 Wifi - Wifi Scheduler page and check the box next to ‘Enable wifi schedule’ under the heading ‘Global Settings’.
- You can set the rules under the heading ‘Schedule Rules’. You can create different rules for different days of the week. There are two default example rules: ‘Business Hours’ and ‘Weekend’. By checking ‘Enable’ for a rule, you activate it. You can also edit or delete a rule. To create a new rule, click on the ‘Add’ button at the bottom.
- In most cases, you will want to check ‘Force disabling wifi even if stations associated’: disable wifi even if there are still devices connected. Otherwise, the router will wait to disable it's wifi until there are no more devices connected.
- When you are finished, click 'Save & Apply' at the bottom to save everything.
- 'Activate wifi': This allows you to manually enable wifi, thereby overriding the Wifi scheduler. It has the same effect as pressing the WPS button on the back of the router.
- 'Disable wifi gracefully': This causes the router to wait until the last device logs off the wifi, and then it will turn off the wifi.
- ‘Disable wifi forced’: This causes the router to turn off the wifi immediately. It has the same effect as pressing the WPS button on the back of the router.
How do I change the wifi password, name, or other settings of a wifi network on the JRS Eco 100 Era?
Log in to the router's settings screen and go to the Eco-100 Wifi -> Wifi Networks page.Changing the name or wifi password of a wifi network
In the default configuration of the JRS Eco 100 Era router, there are 4 networks:- 2.4 GHz band (longest range):
- 1. jrs (hidden network)
- 2. JRS-Eco-100 (visible network)
- 5 GHz band (highest speed):
- 3. jrs (hidden network)
- 4. JRS-Eco-100-5 (visible network)
- SSID: The name of the Wi-Fi network.
- Wifi key: The wifi password for this network. You can use the button with the asterisk to make the password visible.
Adding wifi networks
You can add a guest network, for example, using the ‘Add’ button for the desired wifi band (2.4 or 5 GHz).Deactivating an entire wifi band (2.4 or 5 GHz)
It is possible to permanently deactivate an entire wifi band (2.4 or 5 GHz) if you wish, e.g. to reduce radiation even further. All wifi networks on this band will then no longer be available. To do this, press the red ‘Disable’ button for one of the wifi bands 2.4 or 5 GHz. This wifi band will now always remain off (deactivated). Please note: If you press Disable for 2.4 GHz, the Full Eco function will not work and the 5 GHz wifi, if active, will not go into Full Eco sleep mode when no wifi devices are connected. If you want to disable one wifi band, we therefore recommend choosing 5 GHz. This makes it possible to permanently deactivate the 5 GHz band to reduce radiation, while still being able to switch the 2.4 GHz band on and off by pressing the WPS button. Pressing the WPS button will only switch the non-deactivated wifi bands on and off. If you later decide to re-enable the wifi band, you can use the "Enable" button.Advanced
- Removing wifi networks: In general, we recommend leaving the wifi networks as they are. If you still want to remove the visible networks, e.g. because you don't need them, you can do so using the ‘Remove’ button. The additional wifi networks do not result in more radiation, because the beacon signals from all wifi networks are transmitted in a single pulse.
- Automatic selection of 2.4 or 5 GHz by your devices: Your device (e.g., phone) automatically selects the best connection for the ‘jrs’ network: 2.4 or 5 GHz. If you do not want this and want to be able to explicitly choose the wifi band on your phone, you can rename the 5 GHz ‘jrs’ to, for example, ‘jrs5’.
- Advanced wifi network settings: With the ‘Advanced settings’ button next to a wifi network, you can change advanced settings for this network, such as the security type. Regarding WPA2/WPA3 security: The router is set to WPA2 security by default, since many older devices that only support WPA2 are still in circulation. However, if you do not use such devices, you can safely switch the security for all wifi networks to WPA3. Although a WPA2/WPA3 mixed mode is available, the WiFi Alliance no longer recommends its use for wifi routers as it is not always stable with all devices.
How can I turn the wifi on and off for the JRS Eco 100 Era Router?
There are several ways to turn the JRS Eco 100 Era router's wifi off and back on.Using the WPS button on the router
On the JRS Eco 100 Era, the small WPS button on the back acts as a wifi on/off button. Press the button for 1 second to turn off the wifi. When successful, the wifi lights on the router will turn off. Press again to turn the wifi back on. Even if the wifi has been turned off by the wifi scheduler, you can use the WPS button to turn the wifi back on.Wifi Scheduler page in the settings menu
From the router's settings menu, go to Eco 100 Wifi -> Wifi Scheduler and use the ‘Activate Wifi’ button (to turn it on) or the ‘Disable Wifi forced’ button (to turn it off). This has exactly the same effect as the WPS button. To set up a time schedule for the Wifi Scheduler, see How can you set times on the JRS Eco 100 Era when the wifi turns off, for example at night?Permanently deactivate a wifi band
It is possible to permanently deactivate an entire wifi band (2.4 or 5) if you wish, e.g. to reduce radiation even further. You can do this on the Eco 100 Wifi -> Wifi Networks page. See How do I change the wifi password, name, or other settings of a wifi network on the JRS Eco 100 Era? Switching the wifi on and off with the WPS button will then no longer work for the deactivated wifi band.Automatic Full Eco mode
If you turn off wifi on all your wifi devices (phones, etc.) so that the devices are no longer connected to wifi, the Eco 100 router will automatically go into 100% radiation-free Full Eco sleep mode. Once you turn wifi back on on one of your devices, the router's wifi will automatically turn back on.How can I reset the JRS Eco 100 Era router to its default settings?
To reset the JRS Eco 100 Era router to its default settings, first wait until it has fully booted up and the lights are steady. You can then reset the router in one of the following ways. In both cases, the router will restart and be ready with the default settings after a few minutes.Option 1 - Using the ‘Reset’ button
Use a paperclip to press and hold the recessed ‘Reset’ button for about 10 seconds, until the power light starts flashing rapidly.Option 2 - Using the settings menu
Log in to the router settings menu and go to the System -> Backup / Flash Firmware page. Then click on the ‘Perform Reset’ button.How can I set the JRS Eco 100 Era router to Access Point mode?
The Eco router is set to Router mode by default. In this mode, the WAN and LAN sides of the router are in different subnetworks. This means that routing between the WAN and LAN takes place. For example, it is not possible to access a network drive connected to the Internet modem/router on the WAN side from the LAN side. In access point mode, however, the router acts as a simple network switch, and all devices connected to it (via WAN, LAN ports, and wifi) are on the same LAN network, creating a single network. This gives you access to the network drive connected to your internet modem/router. Access Point mode is also useful if you have multiple Eco 100 routers and want to be able to seamlessly roam (switch) with your wireless devices when moving from one router to another. Keep in mind that you must then make the wifi network names (SSIDs) and wifi passwords of all secondary Eco routers the same as those of the primary router. Please note: you cannot use Access Point mode for the first Eco router if your internet modem is in bridge mode or does not have routing functionality. This is always the case if your modem only has one LAN port.To set the Eco router to Access Point mode
- Log in to the router settings menu
- Go to the System -> Custom Commands page
- Click the 'Run' button under 'Switch to AP mode'
- The router will restart.
To revert to the default Router mode setting
- Log in to the router settings menu
- Go to the System -> Custom Commands page
- Click the 'Run' button under 'Revert to Router Mode'
- The router will restart.
How do I set up a PPPoE connection on the JRS Eco 100 Era (and optionally a VLAN)?
If you have received a PPPoE username and password from your internet service provider, you can enter them into the Eco 100 Era router as follows to ensure your internet connection works:- Log in to the router's settings menu
- Go to Network -> Interfaces
- Click on the ‘Edit’ button next to WAN
- Select PPPoE in the ‘Protocol’ field and click on the ‘Switch protocol’ button
- Fill in the ‘PAP/CHAP username’ and ‘PAP/CHAP password’ fields with the details you received from your provider
- Click on ‘Save’
- Click on ‘Save & Apply’ at the bottom of the page.
- Go to Network -> Interfaces
- Click the 'Edit' button next to WAN
- Click on 'Device', scroll down to 'custom' and enter 'eth1.[VLAN number]' where [VLAN number] is the number you received from your provider.
- Click on ‘Save’
- Click on ‘Save & Apply’ at the bottom of the page.
Troubleshooting: The wifi connection is disrupted, my devices cannot find the JRS Eco network, or the connection is slow [Eco 100 Era]
Is the wifi connection interfering, are devices unable to find the wifi network of the JRS Eco 100 Era router, is the connection faltering or is it very slow? This may be due to interference from other wifi networks. These could be your neighbors' wifi routers, a printer broadcasting a Wifi-Direct network, or even other wireless systems that share the 2.4 GHz wifi frequency (including Bluetooth). Also, if the built-in wifi of your internet modem (e.g., Comcast, Verizon, etc.) is not turned off, this can severely disrupt the signal of the Eco router. After all, in most cases, the Eco router is located right next to the internet modem. If this is the case, see: How do I turn off the wifi on my provider's internet router/modem? The best solution to these problems is to switch off the sources of interference. If that doesn't work, you can set the Eco router to a different channel. The procedure below will help you identify the sources of wifi interference and set the router to a free channel.- Go to the settings menu of the JRS Eco 100 Era router.
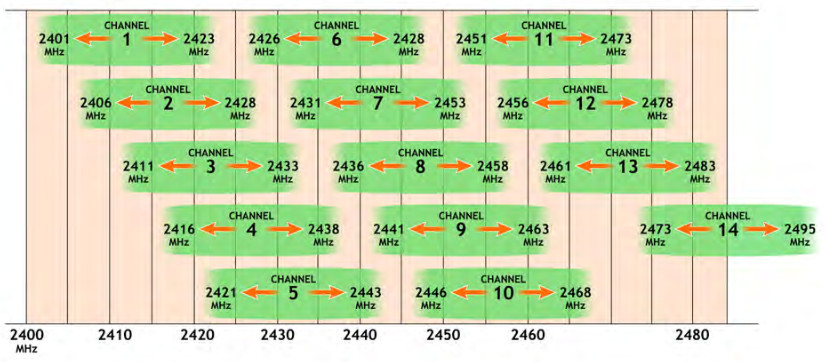
- Go to the Status -> Channel Analysis page. Once the scan is complete, all occupied wifi channels will be displayed. (You can check the wifi names to see whether the wifi of your internet modem is turned off.) Note that the entry ‘Local Interface’ refers to the Eco router itself. Look for a free channel with the least interference. In step 5, you can set the Eco 100 router to this channel. Please note: wifi channels partially overlap each other, and only channel sets with a minimum distance of 5 (e.g. 1, 6, and 11) do not overlap at all. See the image below.
- If there are no channels available that are completely free, check the signal strengths of neighboring wifi networks and choose a channel on which only a weak network is present. Because the wifi channels overlap to some extent, it is best to choose a channel that does not have any very strong interferers right next to it.
- In addition to scanning the 2.4 GHz band, it is also possible to perform a scan for the 5 GHz band by clicking on the ‘radio1 (5GHz)’ tab. However, there is usually little to be found there because the 5 GHz frequency is more strongly attenuated by walls.
- Now we will set up the selected free channel. Go to the Eco 100 Wifi -> Wifi Networks page and press the Edit button next to ‘2.4GHz Radio (longest range)’. Under ‘Channel’ next to ‘Operating Frequency’, you can set the selected channel. When you are done, click the ‘Save & Apply’ button at the bottom of the page.
- It is recommended to keep ‘Width’ (the channel bandwidth) at 20 MHz for 2.4GHz, otherwise there is a high chance of overlap with neighboring wifi networks, if there are.
- To increase the range of the Eco 100 router, you can also increase the transmission power.
Troubleshooting: The router does not enter Full Eco standby mode. [Eco 100 Era]
When the router is in Full Eco standby mode, the 2.4 and 5 GHz wifi lights are off, and the power light turns off for 1 second every 4 seconds, as shown in the animation below. If this does not happen, the router is not in Full Eco standby mode. There are a number of possible causes for this:
There are devices connected to the wifi
In the router's settings menu, on the Eco 100 Wifi -> Registered Devices page, you can see which devices are keeping the router's wifi active. These are the devices with ‘Connected now’ next to them. To put the router into standby/sleep mode, you need to turn off the wifi on these devices. Even if your wireless devices are not connected but their Wi-Fi is still on, they can still send connection requests that keep the router awake.Location Services
You may need to disable the ‘improve location accuracy’ setting on your wireless device or disable location services altogether. If the setting is enabled, your device will continue to broadcast wifi scans even when wifi is turned off!The router is still in Learning Mode
After you have installed the Eco 100 Era router, it first enters Learning Mode. The lights on the router then flash as shown in the animation below. To recognize which devices belong to you, the router keeps a list of devices that you have previously connected to the router: the registration list. Then, if no new wifi devices are added to the registration list within 24 hours, the router automatically switches permanently to Full Eco mode, in which it is completely radiation-free when no devices are connected to the wifi. If you wish, you can skip the learning mode via the settings menu on the Eco 100 Wifi -> Pro Settings page.
 Troubleshooting: The JRS Eco 100 Era router does not wake up from Full Eco sleep mode when I turn on wifi on my device [Eco 100 Era]
When the Eco 100 Era router is in “no signal” mode, the lights will look as shown in the animation below.To activate the Eco router from this standby mode, modern wifi devices such as phones must be connected to the hidden network “jrs”. You only need to set this up once on your device; your device will then save the data and activate the router automatically the next time.
You will notice that this is necessary if the wifi network “jrs” is not listed among the available wifi networks on your wifi device when the Eco 100 router is in Full Eco sleep mode. By connecting to the hidden network “jrs”, you ensure that the Eco 100 router can recognize the connection request from your wifi device. Always connect to this hidden network “jrs”. If you have previously connected to one of the visible networks “JRS-Eco-100(-5)” on your device, we recommend deleting it using the ‘Forget’ option.
Instructions for connecting your devices to the “jrs” network can be found in Chapter 4 of the manual: JRS Eco 100 Era - English User Manual.